There are 5 types of inputs that can be entered into the program:
- Proteins
- Multiple sequence alignemtns
- Motifs
- Output file path
- Optional: A validation set that provides annotations on specific coordinates of the protein input
Protein input Multiple Sequence Alignment Input Motifs Output file path Validation Data Input - If any one coordinate in the validation file has a label of "positive", the protein is given a label of "positive"
- Otherwise, if all motifs on the protein are mapped to coordinates with a "negative" label, the protein is given a label of "negative
- For all other cases, the protein is given a label of "unknown"
- Running in Command-Line
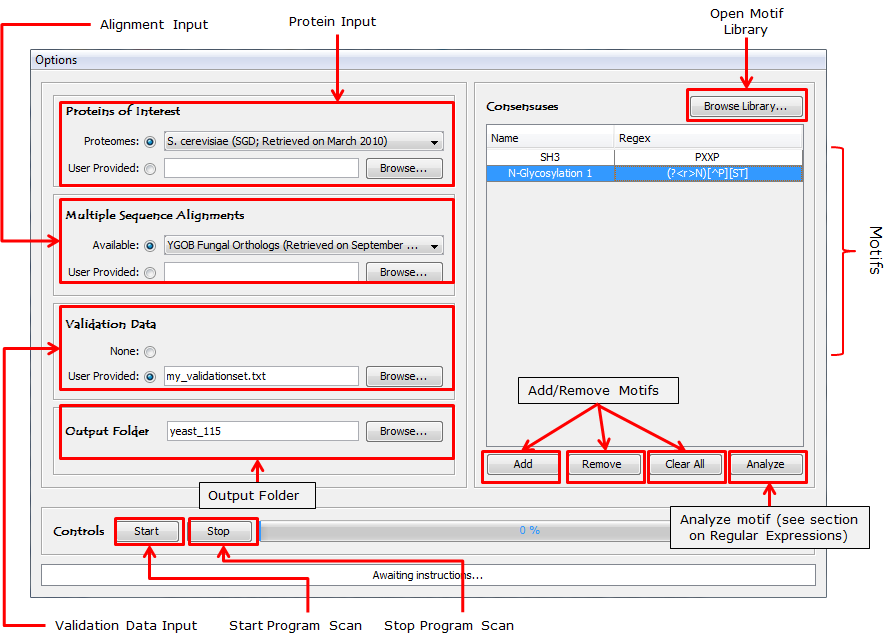
Figure 1: Schematic of the ConDens program's user interace. |
|
Gene CDH1 CDH6 ORC2 ORC6 ... |
This is a set of multiple sequence alignments to be used by the ConDens algorithm to confer evolutionary information on the protein input. If the program is downloaded with datasets, then there are available alignment sets that can be chosen from a combo box (Figure 1XXX). Suppose the user would like to run an analysis on a customly-defined sequence alignment set, he needs to provide an alignment mapping file (see Structure of Alignment Input).
The is a set of motifs to be tested by the ConDens algorithm. It can be entered manually onto the table of motifs in Figure 1XXX or chosen directly from the motif library in Figure 1XXX (simply choose the motifs of interest and click the arrow button at the bottom or press Ctrl + Shift + C. Each motif on this list must have a non-redundant name and an appropriate regular expression (which is not just any regular expression; See Regular Expressions in ConDens).
This is the directory where data output is stored. It is generally best to keep data generated using different proteomes and alignments in separate folders. The structure of the output files is discussed in Structure of Data Output.
This is an optional input that allows users to provide annotations on specific coordinates on a protein (i.e. whether or not a motif is a known target). The format of the input file is expected to be a 3-column tab-delimited file (with header) where the first column is the name of the protein, the second column is the target residue position, and the third column is the annotation label.
|
Gene Position Label CDH1 335 positive CDC6 56 positive CDC6 75 unknown CDC6 189 negative ... |
There are 3 accepted types of labels: "positive" (known target), "negative" (known non-target), and "unknown" (no information; the default label). Anything else is ignored. When ConDens generates a protein-level data output, it assigns a label to the protein using the following rules:
Since we are not providing any preset validation data, the user will have to supply his own if the need arises.
As mentioned above, this program can be run through the shell command
<!-- Root node --> <settings>
</consensuses> |
- It is important to make sure the protein input matches the multiple sequence alignment input. If the former uses Uniprot names and the latter uses Ensembl names, then the program will skip through the entire list of proteins and output nothing. Likewise, proteins listed in the protein input will not be scanned if it is not mapped to an input alignment.
- It is possible for users to generate their preset proteomes, alignments, and even their default settings (as in all the file paths and motifs are loaded automatically once the program starts running). Instructions on how to do these things can be found in Modifying Default Program Settings.